
手写 Huggingface RAG 系统(1)——数据预处理与分块
1. 概述
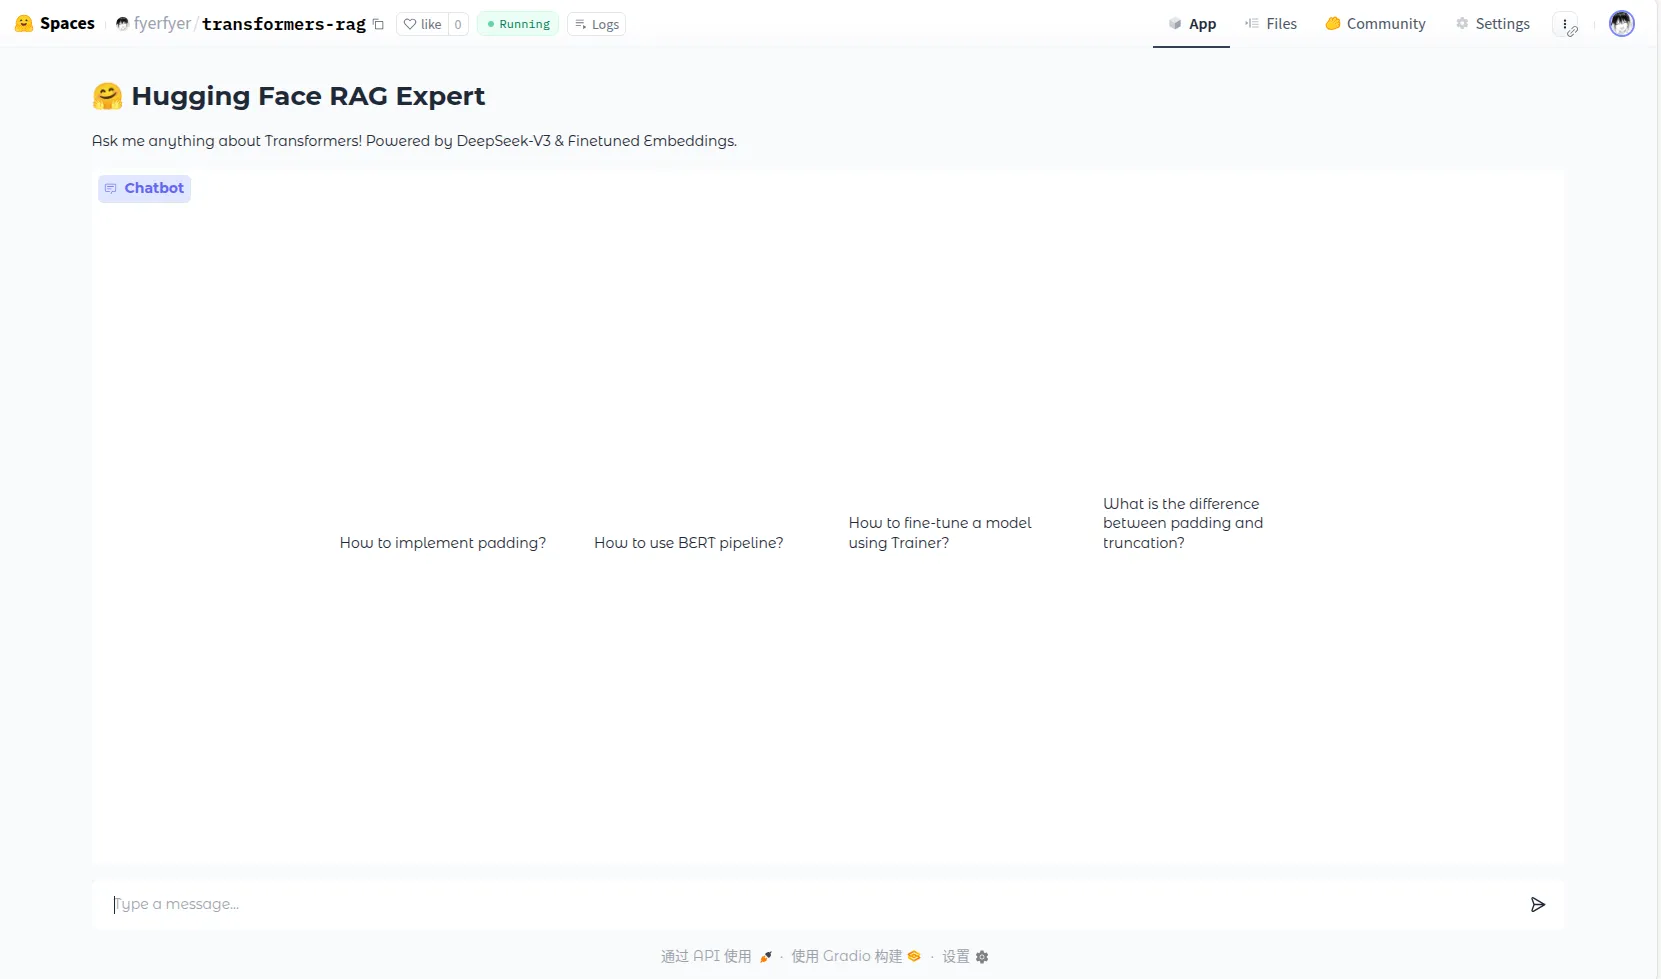
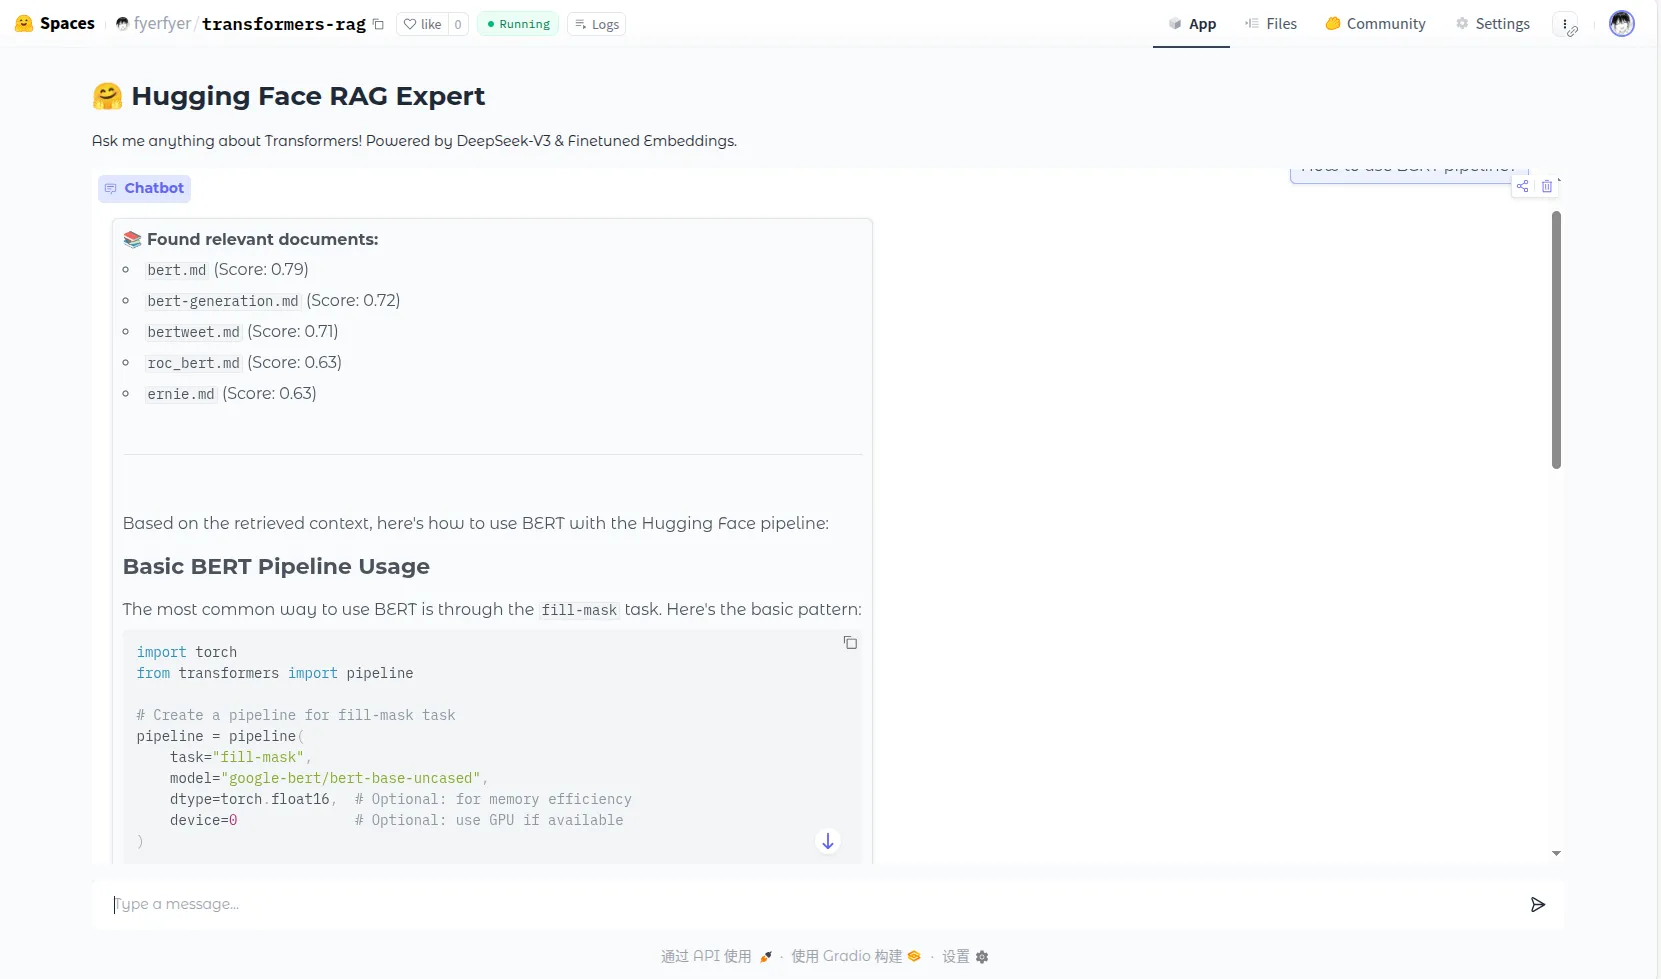
最近自己手写了一个基于 Huggingface transformers 英文文档的 RAG 系统,这里整理一下开发的过程。
所有的组件都是自己写的,Embedding 模型是基于分块后的文档微调 jinaai/jina-embeddings-v2-base-en 模型得到的。最终效果如下:
这一部分写一下数据预处理的相关操作。
2. 数据预处理
我们的文档数据是直接从 Huggingface Github 仓库中直接下载的。原始的文档看起来是这个样子的:
<!--Copyright 2025 The HuggingFace Team. All rights reserved.

Licensed under the Apache License, Version 2.0 (the "License"); you may not use this file except in compliance with
the License. You may obtain a copy of the License at

http://www.apache.org/licenses/LICENSE-2.0

Unless required by applicable law or agreed to in writing, software distributed under the License is distributed on
an "AS IS" BASIS, WITHOUT WARRANTIES OR CONDITIONS OF ANY KIND, either express or implied. See the License for the

⚠️ Note that this file is in Markdown but contain specific syntax for our doc-builder (similar to MDX) that may not be
rendered properly in your Markdown viewer.

-->

# Attention Interface

This page describes how to use the `AttentionInterface` in order to register custom attention functions to use with
supported models.

## Customizing attention function

Most recent models can now switch from one attention function used in the Attention layer to the other, thanks to a simple mapping.
By default, we provide the implementation for [`sdpa`](https://pytorch.org/docs/stable/generated/torch.nn.functional.scaled_dot_product_attention.html),
[`flash_attention_2`](https://github.com/Dao-AILab/flash-attention) and [`flex_attention`](https://pytorch.org/docs/stable/nn.attention.flex_attention.html#module-torch.nn.attention.flex_attention)
as well as `eager`, which is a simple matrix multiplication without any optimization on top.
This is the setting you can usually choose when instantiating a model:

```python
from transformers import AutoModelForCausalLM

model_id = "meta-llama/Llama-3.2-1B"

# Here, using flash attention as an example
model = AutoModelForCausalLM.from_pretrained(model_id, attn_implementation="flash_attention_2")
```
我们需要处理下面的内容:
- 把每个文档开头的 HTML 注释给删掉。
- Huggingface 有下面的特殊 Tag:
<hfoptions id="select-accelerator">
<hfoption id="torchrun">

Use the `--nproc_per_node` to select how many accelerators to use.

```bash
torchrun --nproc_per_node=2  trainer-program.py ...
```

</hfoption>
<hfoption id="Accelerate">

Use `--num_processes` to select how many accelerators to use.

```bash
accelerate launch --num_processes 2 trainer-program.py ...
```

</hfoption>
<hfoption id="DeepSpeed">

Use `--num_gpus` to select how many GPUs to use.

```bash
deepspeed --num_gpus 2 trainer-program.py ...
```

</hfoption>
</hfoptions>
这里的每个 <hfoption> 就是一个子部分,我们将它统一转换成四级标题 ####:
HFO_OPTION = re.compile(r"<hfoption\s+id=\"([^\"]+)\".*?>", re.I)

if in_hfoptions_blocks:
  match = HFO_OPTION.search(line)
  if match:
    option_id = match.group(1)
    new_lines.append(f"#### {option_id}")
    continue
  else:
new_lines.append(line)- 然后是链接的处理。文档中的链接分为下面几类:
- 外部的链接:带
http的链接,这些我们直接返回。 - 内部文件的链接:包括
.md这样的内部文档链接和.png这样的外部资源链接:- 对文档资源,我们将 URL 语义化,把
md这些后缀去掉。然后把里面的相对路径给标准化(因为原文档用的是../xxx这样的相对路径,要把它组合成完整的 URL 路径)。 - 对图片资源:我们将它转换成
Asset path: {abs_target_path}, Caption: {link_text}的语义化形式
- 对文档资源,我们将 URL 语义化,把
- 外部的链接:带
def _patch_relative_links(text: str, file_path: str, doc_base_url: str = "transformers-endocs") -> Tuple[str, List[str]]:
  doc_dir = Path(file_path).parent
  unsolved_links = []

  DOC_EXTENSIONS = {'.md', '.mdx'}
  ASSET_EXTENSIONS = {'.png', '.jpg', '.jpeg', '.gif', '.mp4', '.webp'}

  def replacer(match : re.Match) -> str:
    link_text = match.group(1)
    link_target = match.group(2).strip()

    if link_target.startswith('https://') or link_target.startswith('http://'):
      # 对外部链接 URL,先原样返回
      return f"{link_text}({link_target})"

    parsed_target = urlparse(link_target)
    relative_path = parsed_target.path

    # 内部锚点无路径
    if not relative_path:
      return f"{link_text}({link_target})"

    abs_target_path = (doc_dir / relative_path).resolve()
    try:
      if abs_target_path.suffix in DOC_EXTENSIONS or abs_target_path.is_dir():
        # 去掉拓展名,语义化 URL
        doc_name = abs_target_path.stem if abs_target_path.suffix else abs_target_path.name
        new_target_path = doc_base_url.rstrip('/') + '/' + doc_name
        new_target = urlunparse(('', '', new_target_path, '', parsed_target.query, parsed_target.fragment))
        return f"{link_text}({new_target})"
      elif abs_target_path.suffix in ASSET_EXTENSIONS:
        return f"Asset path: {abs_target_path}, Caption: {link_text}"
      else:
        unsolved_links.append(link_target)
        return link_text.strip('[]')
    except (OSError, ValueError) as e:
      unsolved_links.append(link_target)
      return link_text.strip('[]')

  new_text = MARKDOWN_LINK_RE.sub(replacer, text)
return new_text, unsolved_links- Huggingface 在引用代码时会用下面这种特殊标记,我们需要把方括号中的代码块标记去掉:
[`Trainer`] is powered by Accelerate under the hood, enabling loading big models and distributed training.- 然后是 Huggingface 中其他的特殊 HTML Tag和其他 Tag,比如
[!TIP]和
<div class="flex justify-center">
  <img
    src="https://huggingface.co/datasets/huggingface/documentation-images/resolve/main/transformers/Backbone.png"
  />
</div>
这些也和前面的一样转换即可。
在预处理前最好写一些脚本试试看一些你觉得存在的 Tag 是否存在,否则后面 Chunk 可能会出问题。我就是在 Chunk 完成后发现我的结果里面包含了
<div>然后发现没有处理<div>包裹的 image。
3. 分块
基本设计
然后我们开始对文档的切分。我们的切割方案如下:
- 初步按照标题切割。利用
#结构将文档切分成逻辑单元。如果块大小过大就尝试更小的切块。 - 除了切分文本,我们还需要在每个块保存文档的一些 metadata。这里我们保存文档的 source 和标题。
注意这里的 source 要用相对路径,不然之后在向量数据库中查询要用绝对路径查,非常麻烦。
- 对代码块这样的完整语义单元(我的代码偷懒没有处理表格),不要从中间切断。
- preprocess 后的文档中可能会有很多重复的内容,比如:
This model was released on 2021-01-02 and added to Hugging Face Transformers on 2021-08-17.Hugging Face Transformers library这些东西最好在分块阶段进行去重,不然我们的块中会包含大量无用的数据。
这个问题是在构建向量数据库索引的时候发现的,当时在进行简单查询和上下文查询的对比测试时得到了下面的结果:
# Comparison Test: padding

Simple query:
[1] Score: 0.5321 | Context: Text generation > Pitfalls > Padding side > right pad

#### right pad

```py
model_inputs =...
  [2] Score: 0.5321 | Context: Text generation > Pitfalls > Padding side > right pad
```

#### right pad

```py
model_inputs =...
  [3] Score: 0.5321 | Context: Text generation > Pitfalls > Padding side > right pad
```

#### right pad

```py
model_inputs =...

📝 Contextual query: In the context of Hugging Face Transformers library: padding
  [1] Score: 0.6031 | *This model was released on 2019-12-11 and added to Hugging Face Transformers on 2020-11-16.*...
  [2] Score: 0.6014 | *This model was released on 2021-09-14 and added to Hugging Face Transformers on 2021-10-15.*...
  [3] Score: 0.6014 | *This model was released on 2021-09-14 and added to Hugging Face Transformers on 2021-10-15.*...
```
加上上下文的查询反而搜出了很多乱七八糟的结果,而且都是带着同样的
This model was released on开头。然后就去查 chunker 了。
这些是总体的切块方案,之后还有一些细节在下面讲解。
Tokenize
我们要控制每个分块的最大大小,直接用 text 的长度是不精确的,我们用 tictoken 的 cl100k_base Tokenizer 来精确计算 token 数量:
self.tokenizer = tiktoken.get_encoding(tokenizer_name)

def count_tokens(self, text: str) -> int:
return len(self.tokenizer.encode(text))标题上下文
我们在每个分块的开头保留一个标题导航 #一级标题 > ##二级标题,让模型能够有当前块的上下文:
def _add_header_context(self, text: str, headers: List[str]) -> str:
  if not headers:
    return text
  headers_chain = ' > '.join(headers).strip()
  return f"Context: {headers_chain}\n\n{text}"
这里需要的 headers 会在
标题分块
接下来就是正式的分块了。首先我们写一个根据标题切分的函数,这个函数根据标题将原有 text 进行切分,切成基本的语义单元。在切分过程中,我们要记录这个标题以及它们前面的标题 headers,这个东西之后会用来构建每个块的标题导航
这是初步的切分,之后会对标题切分得到的块进行进一步切分。
同时需要注意:有的代码块会带着 # 的注释,因此我们需要一个 flag 来标记当前行是否在代码块内。
def _split_by_header(self, text: str) -> List[Dict]:
  lines = text.split('\n')
  sections = []
  current_headers = []
  current_lines = []
  in_codeblock = False

  for line in lines:
    if CODEBLOCK_RE.match(line):
      in_codeblock = not in_codeblock

    # 检测超长行(通常是格式化不当的代码或数据)
    # 如果行太长,尝试在合适的位置截断或换行
    if len(line) > 500 and not in_codeblock:
      # 尝试在逗号、空格等处分割超长行
      if ', ' in line:
        parts = line.split(', ')
        # 每50个元素一行
        for i in range(0, len(parts), 50):
          current_lines.append(', '.join(parts[i:i+50]))
        continue

    match = HEADER_RE.match(line)
    if match and not in_codeblock:
      if current_lines:
        sections.append({
          'headers': list(current_headers),
          'content': '\n'.join(current_lines).strip()
        })

      level = len(match.group(1))
      title = match.group(2)
      current_headers = [h for i, h in enumerate(current_headers) if i < level - 1]
      current_headers.append(title)
      current_lines = [f"{'#' * level} {title}"]
    else:
      current_lines.append(line)

  if current_lines:
    sections.append({
      'headers': list(current_headers),
      'content': '\n'.join(current_lines).strip()
    })

  return sections
这里的超长行处理是建立索引后发现问题打的补丁。
之后我们会基于这里切出的块进行进一步切分。
迭代切分
我们根据标题切分的块可能超出了块的最大大小,因此我们还需要进行迭代切分。
迭代切分的原理如下:由于标题切出的块太大了,我们尝试下一个较大的切分单元(段落);如果这个切出来的块还是太大了就继续试更小的切分单元。然后如果找到了可以的切分单元的话,就把它存起来。最后返回这个过程中所有切出来的块就行。具体而言,对于正在处理的 part,我们考虑下面的情况:
- 当前 part 没有超出最大大小,就把这个块存进
current_chunk_parts中,然后继续处理剩下的 part、在current_chunk_parts中装尽可能多的 part。 - 加入当前 part 超出最大大小、但是没加入的话没问题:先保存当前记录的块
current_chunk_parts到最终的分块结果final_chunks中,然后准备之后的切分:具体而言就是把下个current_chunk_parts的 overlap 设置好。之后的 part 就可以直接 append 了。 - 当前 part 自己就已经超出最大大小了:首先仍然是保存当前记录的块,然后就对这个大块进行递归切分、递归调用切分函数。
迭代切分得到的就是最终的切分结果了,切分结果的 source 是传入的参数,headers 是标题切分中保存的。标题上下文会在初始时和每次对 current_chunk_parts 的保存中进行添加。
def _recursive_split(self, text: str, headers: List[str], file_path: str) -> List[Dict]:
  if not text:
    return []

  base_context = self._add_header_context("", headers)
  base_context_token = self.count_tokens(base_context)

  if self.count_tokens(text) + base_context_token <= self.chunk_size:
    return [{
      'text': self._add_header_context(text, headers),
      'metadata': {'source': file_path, 'headers': headers}
    }]

  # 增加更多语义边界
  separators = [
    '\n\n',      # 段落
    '\n',        # 行
    '. ',        # 句子(保留空格)
    '! ',        # 感叹号
    '? ',        # 问号
    '; ',        # 分号
    ', ',        # 逗号
    ' ',         # 空格
  ]

  top_separator = None
  for sep in separators:
    if sep in text:
      top_separator = sep
      break

  if top_separator is None:
    # 如果完全找不到分隔符,强制在固定长度处截断(保留完整性)
    # 这种情况很少见,通常是超长的 URL 或代码
    max_chars = self.chunk_size * 4  # 粗略估计字符数
    if len(text) > max_chars:
      return [{
        'text': self._add_header_context(text[:max_chars] + '...', headers),
        'metadata': {'source': file_path, 'headers': headers}
      }]
    else:
      # 文本虽长但没超限,直接返回
      return [{
        'text': self._add_header_context(text, headers),
        'metadata': {'source': file_path, 'headers': headers}
      }]

  parts = text.split(top_separator)
  final_chunks = []
  current_chunk_parts = []
  current_chunk_tokens = base_context_token

  for part in parts:
    if not part:
      continue

    part_tokens = self.count_tokens(part)
    sep_tokens = self.count_tokens(top_separator) if (current_chunk_parts and top_separator) else 0

    # 如果添加当前 part 超限,保存当前状态并设置 overlap
    if current_chunk_tokens + sep_tokens + part_tokens > self.chunk_size:
      if current_chunk_parts:
        final_chunks.append({
          'text': self._add_header_context(top_separator.join(current_chunk_parts), headers),
          'metadata': {'source': file_path, 'headers': headers}
        })

        overlap_chunks = []
        overlap_tokens = base_context_token
        for p in reversed(current_chunk_parts):
          p_tokens = self.count_tokens(p) + (self.count_tokens(top_separator) if top_separator else 0)
          if overlap_tokens + p_tokens <= self.chunk_overlap:
            overlap_tokens += p_tokens
            overlap_chunks.insert(0, p)
          else:
            break

        current_chunk_parts = overlap_chunks
        joined = top_separator.join(current_chunk_parts) if top_separator else ''.join(current_chunk_parts)
        current_chunk_tokens = base_context_token + self.count_tokens(joined)
        if current_chunk_parts and top_separator:
          current_chunk_tokens += self.count_tokens(top_separator)

      # 如果当前 part 本身就超限,需要特殊处理
      if part_tokens + base_context_token > self.chunk_size:
        # 先保存已有的 chunk
        if current_chunk_parts:
          final_chunks.append({
            'text': self._add_header_context(top_separator.join(current_chunk_parts), headers),
            'metadata': {'source': file_path, 'headers': headers}
          })
          current_chunk_parts = []
          current_chunk_tokens = base_context_token

        # 递归拆分这个超大的 part
        recursive_chunks = self._recursive_split(part, headers, file_path)
        final_chunks.extend(recursive_chunks)
        continue

    current_chunk_parts.append(part)
    current_chunk_tokens += part_tokens
    if len(current_chunk_parts) > 1:
      current_chunk_tokens += self.count_tokens(top_separator)

  if current_chunk_parts:
    final_chunks.append({
      'text': self._add_header_context(top_separator.join(current_chunk_parts), headers),
      'metadata': {'source': file_path, 'headers': headers}
    })

return final_chunks总体切分流程
最终的切分流程如下:
- 对 text 进行标题分块。
- 对每个标题分块都进行迭代分块。
- 切分完成后进行去重操作,最终生成完整的
jsonl文件。
sections = self._split_by_header(text)
chunks = []
for section in sections:
  header_path = section['headers']
  content = section['content']

  sub_chunks = self._recursive_split(content, header_path, source_path)
  chunks.extend(sub_chunks)

return chunks